Compare at Price on Shopify: How to Set It Up
You've picked a shirt for your next promotion, opened Shopify, and found two pricing fields that look almost interchangeable. You want shoppers to see a convincing markdown, but you don't want to accidentally charge the wrong amount or advertise a saving you can't justify.
Setting compare at price on Shopify is straightforward. Using it well takes a little more care: the selling price needs to protect your margin, the reference price needs a genuine history, and the storefront needs to show both clearly. Get those pieces right, and your print-on-demand brand can run sales that feel exciting without sacrificing credibility.
Table of Contents
- Where Compare at Price Appears on Your Store
- Tax, Analytics and Market Rules to Check First
- How to Set and Bulk-Edit Compare at Prices
- Compare at Prices Across Sizes and Variants
- Pricing Psychology That Keeps Sale Prices Credible
- Set Up Your First Sale Price This Week
Where Compare at Price Appears on Your Store
A shopper opens your tee's product page and sees a crossed-out reference price beside a lower selling price. They immediately understand the offer: this is the price they'll pay now, compared with the price you're using to establish the saving.
The rule behind that display is simple. According to Shopify's sale-pricing guidance, the compare-at price must be higher than the current price, such as a current price of $10 against a compare-at price of $30. Equal or lower comparison values won't produce the intended sale presentation.
You'll find these values in the product's pricing controls in Shopify admin, with variant-level controls for products that have options. Price is the selling amount. Compare-at price is the reference amount, not an additional charge.
What shoppers see along the purchase path
Where each price appears on the storefront
| Location | Compare-at price shown? | What the shopper sees |
|---|---|---|
| Product page | Yes | Struck compare-at price beside the sale price |
| Collection page | Yes | Struck compare-at price beside the sale price |
| Checkout | No | Only the sale price |
The product and collection displays above describe a theme that supports and displays sale pricing. Your theme controls the exact styling, placement, and any accompanying sale badge.
Compare-at pricing isn't a discount code or an automatic discount. You're setting a lower product price directly, then showing a reference beside it. Shopify isn't waiting until the cart to subtract the difference, and the crossed-out amount never becomes part of the shopper's checkout total.
Storefront check: Open a live product on your phone and desktop. Check the collection card as well as the product page, because a clear product-page offer can still be easy to miss in a collection grid.
If the comparison is missing, first confirm that the selected variant has the correct saved values. If those values are valid, inspect the theme's product-price and collection-card settings before changing your pricing again. A display problem needs a display fix, not a larger advertised markdown.
Tax, Analytics and Market Rules to Check First
You can't always use the price you consider normal as your reference price. For sellers reaching European customers, a recent promotion can change which comparison is appropriate.
Shopify's Pricing Indication Directive guidance states that an announced reduction for customers in the European Economic Area must use the lowest price charged during the previous 30 days or more, including earlier promotions; consequently, a shirt normally priced at €30, then offered at €24, can't be advertised against that normal price if €22 was the relevant lowest price during that period. The new reduced selling price must also be lower than the applicable reference.
That's why price history belongs in your promotion workflow, not just your bookkeeping. Record the product, variant, market, currency, selling price, and effective dates whenever you change an offer. Keep previous promotional prices rather than replacing them with the latest entry.
A price log gives you a defensible reference before you publish the sale, rather than a reconstruction after someone questions it.
Keep tax treatment separate from the display
The compare-at amount is a display value, not money collected from the customer. Work from the actual selling amount when checking tax calculations, and confirm local treatment with your accountant, especially where tax-inclusive pricing or other discounts are involved.
Don't try to correct an unexpected tax total by changing the reference price. Review the product's tax settings, the customer's market, and the order calculation instead.
Measure the promotion you actually ran
Sales reports reflect the transaction, not the crossed-out amount as revenue. Annotate the promotion's start and finish, and record changes to advertising, shipping offers, and email activity alongside it.
Our guide to analytics for eCommerce can help you build a more useful reporting routine. For this sale, assess orders, revenue, and contribution after production, fulfillment, payment fees, and advertising rather than treating a busier order feed as the whole result.
Before publishing, complete this short check:
- Keep the history: Record prices by market and variant, including temporary offers.
- Mark the campaign: Save the promotion's start and end dates with your reporting notes.
- Review European markets: Check the applicable reference before announcing a reduction.
- Check the economics: Make sure the actual selling price leaves room for the costs you'll incur.
How to Set and Bulk-Edit Compare at Prices
Start with the product editor when you're learning. It's easier to spot a mistaken price on a single listing than to diagnose it across a collection after an import.
Before editing, decide on the genuine reference, the sale amount, and which variants participate. Keep a copy of your existing pricing so you can restore it deliberately when the promotion ends. If the listing itself still needs work, use our guide to adding products to Shopify before applying the promotion.
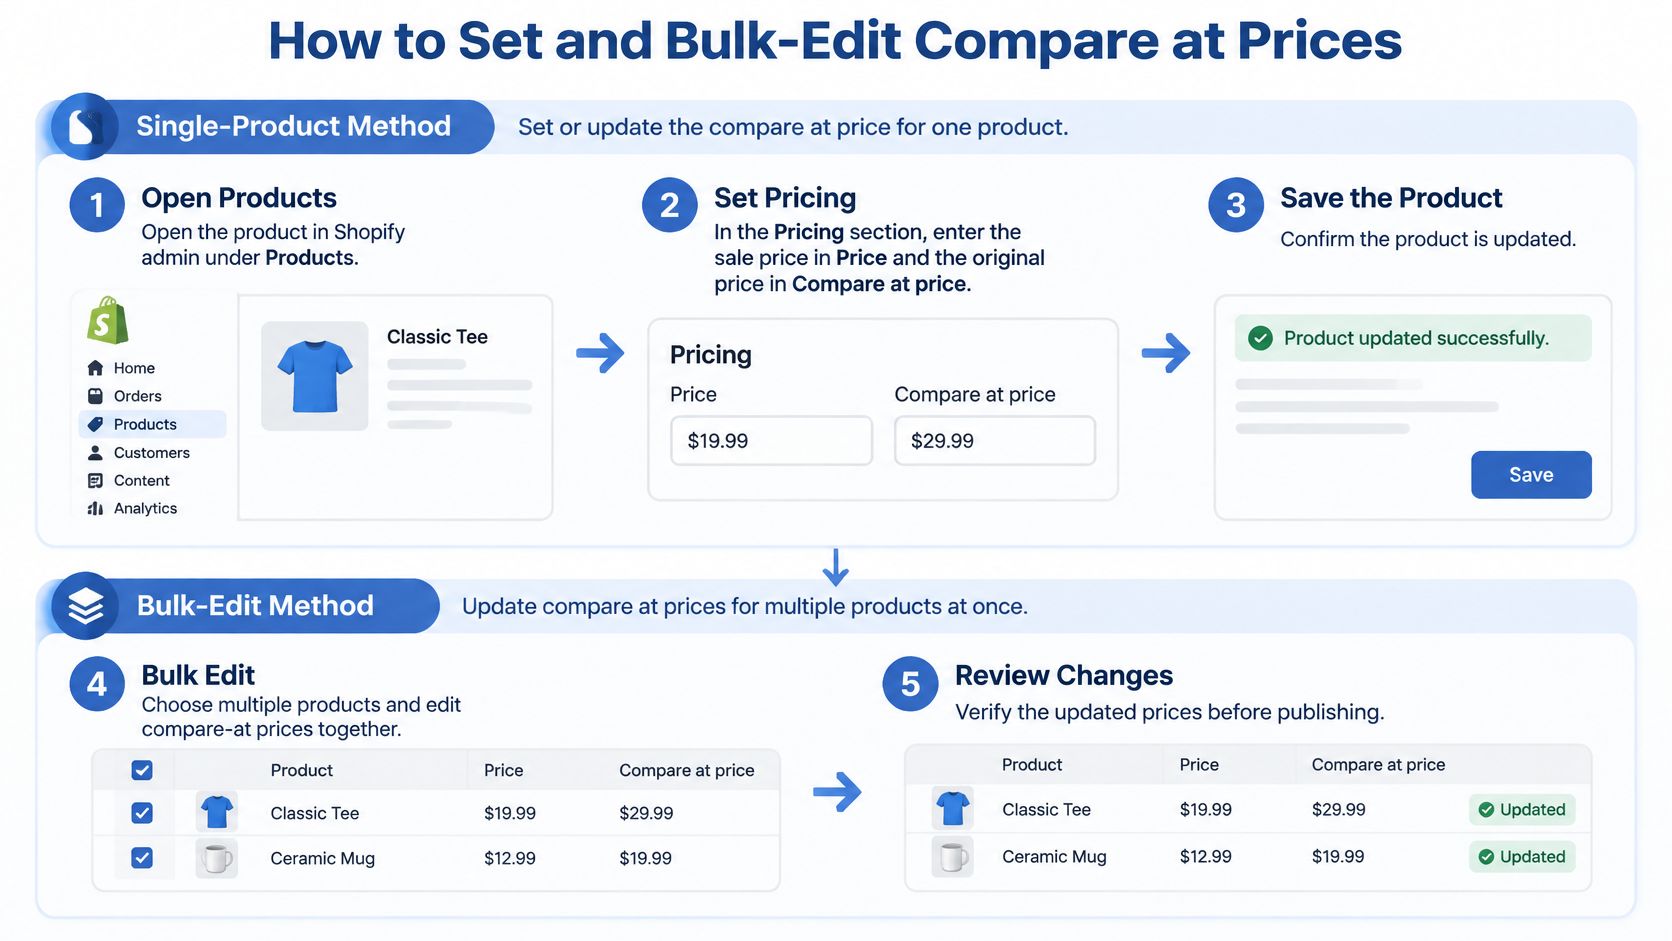
Set an individual product
Open the product under Products in Shopify admin. Check the title and options before editing, particularly when similar designs use the same garment.
In the Pricing section, enter the sale amount in Price. This is the amount you intend to charge, so check it against your production and fulfillment costs.
Enter the genuine reference in Compare-at price. A comparison value without a lower selling price won't create the sale presentation you're trying to publish.
For products with variants, open the relevant variant rows and set their pricing individually. Don't assume a parent-level edit has correctly covered every size and color.
Save, then inspect the storefront. Select the participating options and verify that the current price, reference, and sale messaging agree.
The workflow below shows how individual edits connect to a larger pricing update.
Update a collection or catalog
For a collection-sized promotion, select the relevant products and open Shopify's bulk editor. Add the price and compare-at columns, review the variant rows, and save the changes before leaving. This is a useful middle ground when you want spreadsheet-style editing without exporting files.
For a CSV workflow, continue with these steps:
Export your catalog and retain an untouched backup. Work from Shopify's exported structure rather than building an import file from memory.
Edit the compare-at column only for the intended rows, updating the selling-price column where needed. Check for blank price cells and incorrect variant identifiers or option mappings, because either can undermine the intended update.
Import the edited file and review the results. Read the import preview and any warnings, then check representative products and their variants on the live store.
Don't assume that an import completed correctly just because the file uploaded. Compare the saved admin values with the storefront, and check that unrelated products haven't changed.
Rollback rule: Preserve the original export and a separate record of the intended changes. You should be able to explain and reverse every edited row.
To end the sale display, clear Compare-at price on the participating products or variants and save. Clearing that field removes the comparison, but it doesn't restore a previous selling amount. If the promotion is ending, set Price to the amount you intend to charge afterward.
With CSV, blank only the compare-at cells that should stop displaying a markdown. Confirm the import's overwrite behavior before proceeding, then inspect the resulting listings.
Choosing a method for setting compare at prices
| Method | Best for | Watch out for |
|---|---|---|
| Product editor | One to three products or variants | Slowest route, but easiest to check line by line |
| Bulk editor | Several products at once | Confirm every row saved before leaving the page |
| CSV import | A full catalog or repeated seasonal sales | Blank price cells and wrong variant IDs |
Compare at Prices Across Sizes and Variants
A tee listing reads as one product to a shopper, but every pricing decision happens at the variant level. Sizes, garment choices, and colors carry different costs and different genuine selling histories, and each one has to stand on its own record.
Shopify's Admin GraphQL Product documentation represents a product's compare-at pricing as minimum and maximum values in the shop's default currency. The API stores a range, but your theme decides how that range reaches the shopper. One theme shows a "from" price, while another updates the comparison only after a size gets selected. Inspect the live storefront rather than trusting the admin view.
For apparel, review each garment option alongside its pricing instead of treating the listing as one interchangeable item.

A worked tee example
Suppose your small tee sells for $20 against a genuine $30 reference, while your extra-large tee sells for $26 against a genuine $35 reference. Use these amounts to see the mechanics; the figures are examples, not benchmarks.
Sale prices and compare-at prices for a sample tee
| Variant | Sale price | Compare-at price |
|---|---|---|
| Tee in S | $20 | $30 |
| Tee in XL | $26 | $35 |
| Storefront range | $20 to $26 | $30 to $35 |
The final row shows the calculated ranges for this example. Your theme may display a starting price first, then refresh the comparison when the shopper picks a size.
Higher production costs can justify higher selling prices, but cost alone doesn't establish a legitimate former price. The XL reference only counts if you offered that variant at that amount. A markdown is believable when the price history behind it is real, so each variant's reference should match the record for that variant and that market.
- Use individual references: Set variant-specific values where the genuine reference prices differ.
- Share values carefully: A common compare-at value works only when it's supportable across every participating variant.
- Check the extremes: Select the smallest and largest options, then any premium garment choice, to catch mismatched displays before customers do.
Resist the urge to pad a size's reference so the range looks more impressive. Shoppers flip between options in seconds, and one inflated variant makes the whole offer look manufactured. A consistent, explainable set of prices does more for your sale than an exaggerated headline ever will.
Pricing Psychology That Keeps Sale Prices Credible
A real reference price gives shoppers a reason to act. An invented reference asks them to believe a saving that your pricing history can't support.
The FTC's Guides Against Deceptive Pricing describe a legitimate former price as one offered regularly for a reasonably substantial period, openly and in good faith. The guidance distinguishes that from an artificially inflated amount created to advertise a markdown, and cautions against saying “formerly sold at” unless substantial sales occurred at that price.
You don't need theatrical discounts to make a print-on-demand offer appealing. A design that speaks to a specific customer, a clear product presentation, and a genuine saving give you a compelling proposition.
Make the offer easy to understand and easy to defend.
Use our guide to pricing strategy types to choose an approach that fits your brand rather than copying another store's sale badge.
- Do keep references genuine: Preserve evidence of when and where you offered the product.
- Do make the saving readable: Keep the selling price prominent and the comparison unambiguous.
- Don't manufacture urgency: Use an end date you intend to honor.
- Don't run a permanent markdown: If the lower amount is your everyday price, present it clearly as such.
You're building confidence in the next purchase as well as enthusiasm for this one.
Set Up Your First Sale Price This Week
Choose a proven seller, not a product you're hoping a discount will rescue. A listing that already attracts interest gives you a clearer starting point for evaluating the offer.
Pull its price history, identify the appropriate reference for each market, and decide which variants will participate. Write down the sale amount and your expected contribution after costs before touching the admin fields.
Run a controlled test
- Prepare the listing: Check the garment description, size information, mockups, and shipping message so shoppers can make a confident decision.
- Publish deliberately: Save the pricing changes and inspect the product and collection views on mobile and desktop.
- Record the conditions: Note advertising changes, email sends, and other promotions that could affect the outcome.
- Schedule the finish: Plan how you'll remove the comparison and restore your intended everyday selling price.
If you already have a Shopify store, we can work with it and bring it up to standard rather than starting from scratch, which usually saves time.
Run your first test for seven days, then compare orders, revenue, and contribution with the previous week. Treat that comparison as a practical signal, not proof that pricing alone caused the result. You'll finish with a checked workflow, a documented offer, and a much clearer decision about your next promotion.
Skup offers software, coaching, and community to help you build a Shopify brand you're proud of. Visit Skup to explore support for turning thoughtful pricing, clear product listings, and disciplined sale testing into a repeatable store-building routine.