8 Product Photography Tips for POD Apparel Sellers
A strong POD apparel photography system combines a clear hero image, useful fit and detail views, consistent lighting, and a fast repeatable workflow. Product pages with 7 or more images can convert about 1.6 to 2.4 times better than single-image pages, while listings with 8 or more images can receive around 3.6 times more views than listings with 1 to 3 images. PixelPanda's product imagery data provides those benchmarks.
Table of Contents
- Make Every Apparel Design Easier to Buy
- 1. Master Lighting for Professional Product Mockups
- 2. Use Lifestyle Shots to Tell Your Brand Story
- 3. Perfect Your White Background Setup for Clean, Focused Listings
- 4. Showcase Design Details With Close-Up and Macro Photography
- 5. Implement Consistent Color Grading Across Your Product Catalog
- 6. Use Model Variety and Sizing Shots to Increase Conversion and Reduce Returns
- 7. Use Angle and Perspective Shots to Showcase Product Dimensions
- 8. Master Post-Processing Optimization for Platform Consistency and Fast Scaling
- 8-Point Product Photography Comparison
- Turn Your Next Design Into a Complete Image Set
Make Every Apparel Design Easier to Buy
POD shoppers can't touch the fabric, inspect the print, or try on a shirt before ordering. Your images have to answer those questions quickly. Buyers need to understand the design, fit, color, texture, and real-world context before they feel comfortable clicking purchase.
That's why product photography isn't a one-off creative task. It's a repeatable sales system. A practical workflow starts with a clean hero image, adds front and back or angle views, explains fit with people and sizing context, reveals print and fabric details, then adapts the same product into mobile-friendly and social assets.
You don't need a large studio to begin. A phone, a steady surface or tripod, soft window light, and a simple backdrop can produce useful product images when the setup stays consistent. For a broader overview, use this guide to shooting product photos as a reference while building your process.
AvatarIQ can also help when coordinating models, locations, or photographers slows down your launch. It creates apparel mockups and photoshoot-style images with AI-powered models, giving you more ways to present a design without arranging a physical shoot for every variation.
The following eight product photography tips turn each new design into a complete, channel-ready image set.
1. Master Lighting for Professional Product Mockups
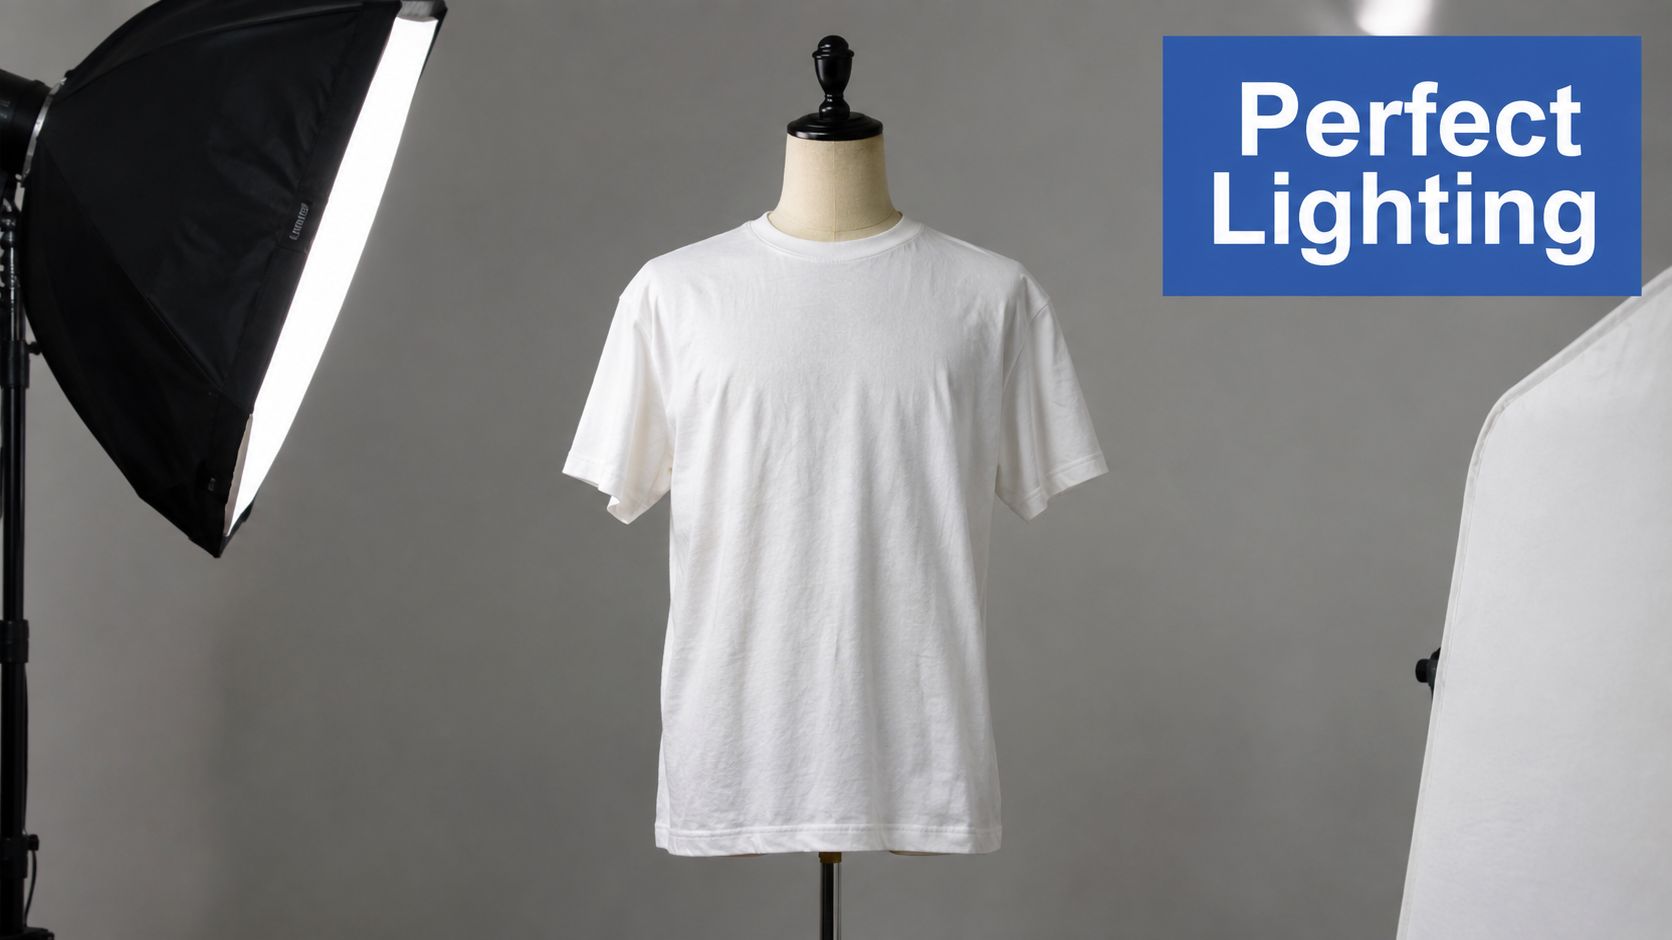
Lighting controls whether shoppers can inspect an apparel design with confidence. A repeatable setup separates the garment from the background, shows fabric shape, and keeps the print readable without harsh contrast. Build it once, then use the same arrangement across each design so your image sequence stays consistent.
Start with one main light at roughly a 45-degree angle to the shirt or hoodie. This adds dimension while preserving visibility on the front graphic. A large window with indirect daylight is a practical starting point. If one side falls too dark, place white foam board or a reflector opposite the window to return light to the shadows.
Direct overhead light can flatten the garment and create distracting shadows around the neckline, sleeves, and print. Keep warm household bulbs separate from daylight. Mixed color temperatures make accurate color correction harder, especially when you are preparing mobile-friendly listing images.
Practical rule: Start with the actual printed garment in your test shots. Ink density, fabric color, and texture can change how the light behaves.
Use daylight-balanced lighting as a baseline. Product photography guidance often places neutral daylight around 5500K, or within a 5000K to 5500K range. FrameOnce's lighting guidance explains this baseline. Check the printed result, then keep the same white balance across the hero image, detail views, and fit sequence.
Shoot at a consistent time of day with a window, or use controlled artificial lighting when repeatability matters. AvatarIQ can generate professionally lit mockup presentations without rebuilding a physical setup for every variation. For a physical workflow reference, compare your process with this free T-shirt mockup guide.
2. Use Lifestyle Shots to Tell Your Brand Story
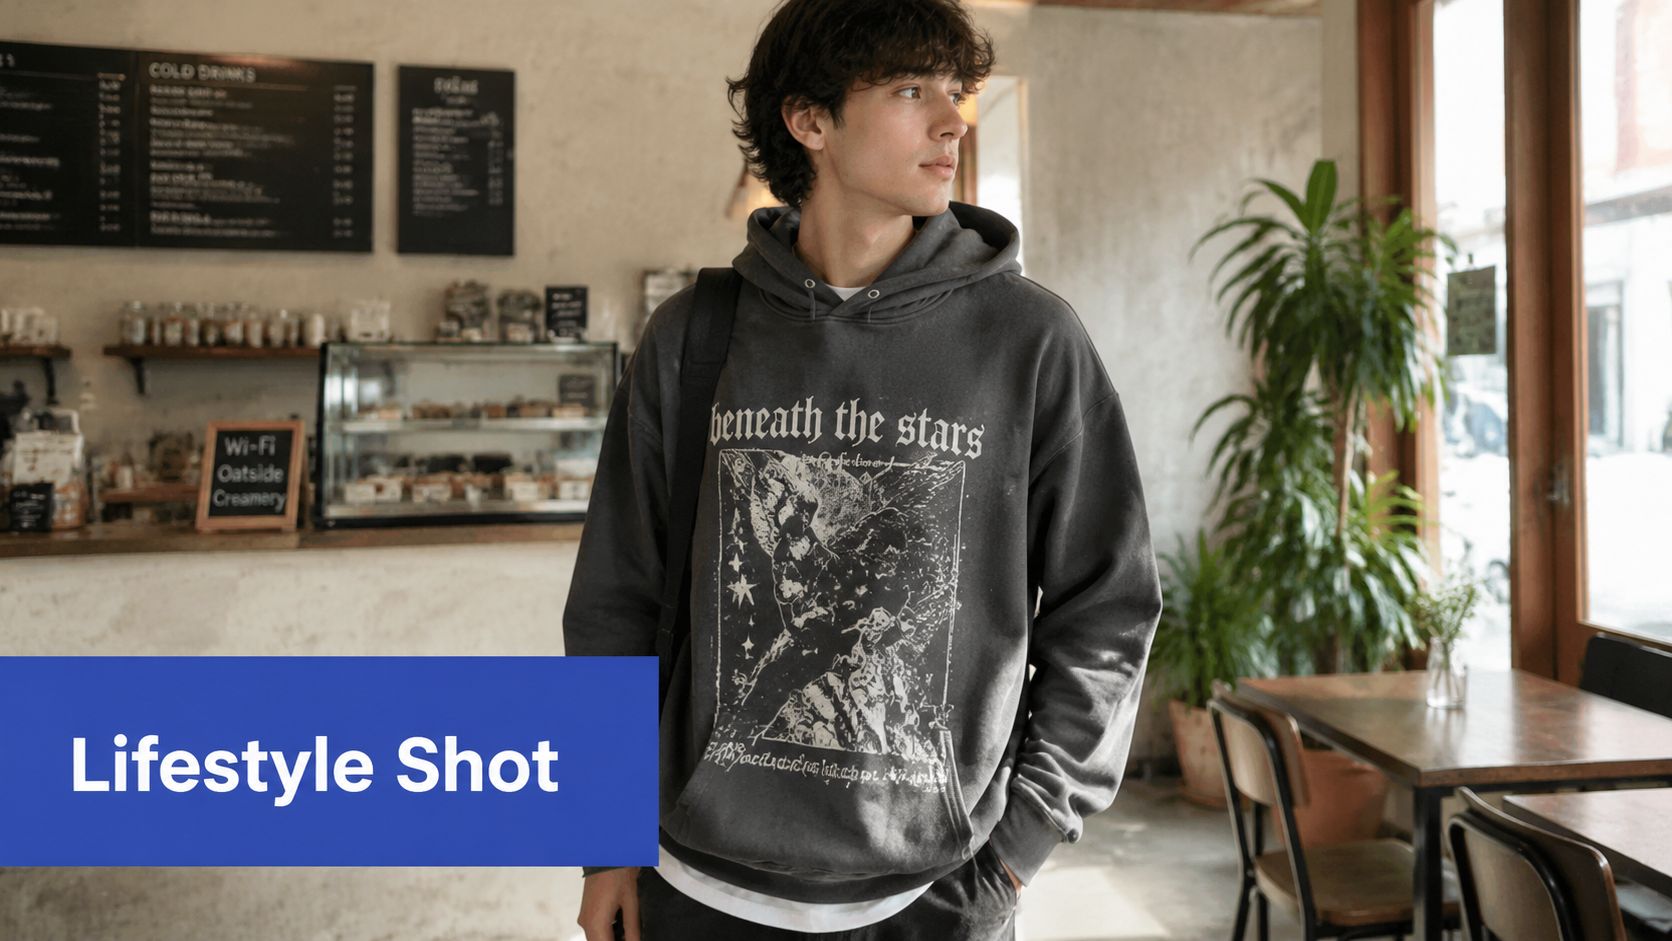
A lifestyle image helps shoppers place the garment in a real setting. It adds context to the design, fit, and audience, then gives your listing a clearer sequence from inspiration to evidence.
Match the setting to the buyer you want to reach. A minimalist hoodie may suit a quiet coffee shop, adventure apparel can appear on a hiking trail, and professional-casual designs may fit an office. Community-focused products can work in family or group scenes where belonging supports the design's message.
Keep the garment visible throughout the shoot. Capture posed and candid moments, such as adjusting a sleeve, holding a coffee cup, or walking through a neighborhood. These actions show how the product fits into daily use more naturally than a rigid pose, while the print remains easy to inspect.
You can work with friends, family, local creators, or customers instead of hiring expensive talent. Choose people who resemble your target audience, and include varied body types, skin tones, and ages when the brand serves a broad customer base.
Build context around the garment
Lifestyle images must answer practical fit and construction questions. Include a pocket close-up, show sleeve length, and capture how the fabric falls on the body. A stylish scene adds mood, but the product should remain the focal point.
For a graphic hoodie, sequence the images as a repeatable listing workflow:
- Coffee shop hero: Show the full front design in a casual environment.
- Wearing detail: Capture the hood, cuffs, pocket, or fabric texture.
- Active context: Show how the hoodie looks while the model moves.
- Clean product view: Return to a straightforward image for clarity.
This sequence supports mobile shoppers, who often scan the first images quickly, while the detail and movement views provide evidence before purchase. Use the same order across related designs so image production and listing updates remain easy to repeat.
AvatarIQ can create lifestyle mockups with AI models when a physical shoot would delay a listing. Review each generated image for accurate print placement, believable garment structure, and a model representation that matches the product.
The strongest image sets pair aspiration with proof. Vovv's ecommerce imagery guidance reports that listings combining user-generated imagery with studio shots converted 9% better across a sample of 1,200 products than studio-only listings, making authentic context a useful complement to polished catalog images.
3. Perfect Your White Background Setup for Clean, Focused Listings
A white-background image gives shoppers a fast, unobstructed view of the product. It also creates a consistent catalog, which becomes increasingly valuable as your POD store adds more designs and garment types.
Most major ecommerce marketplaces require a pure white main product background. Amazon's main-image rule specifies RGB 255,255,255, requires the product to fill at least 85% of the frame, and prohibits props, logos, watermarks, and text overlays. Simple Resizer's ecommerce image guidance summarizes these requirements.
You can build the setup cheaply. Use white foam board, paper, or a clean white bedsheet as the backdrop. Position the garment several feet away from the background to reduce visible shadows, and light the background separately when possible. If the background isn't perfectly white in camera, background removal or a clipping workflow can correct it later.
A hanging shirt often communicates drape and length better than a flat lay. Use a flat lay when the full design composition matters, especially for oversized artwork or coordinated front-and-back layouts. Hoodies benefit from a front image, an angled image, and a view that shows their shape.
Create a catalog standard
Choose the same camera height, garment scale, backdrop, and crop for every white-background image. A shopper should be able to compare a T-shirt, crewneck, and hoodie without the product jumping around the frame.
Keep a simple style guide that records:
- Garment position: Centered, hanging, or laid flat.
- Frame usage: Similar product size across listings.
- Lighting direction: Consistent highlights and shadow behavior.
- Background treatment: Pure white for marketplace hero images.
- Color handling: One documented approach for each supplier or garment type.
AvatarIQ can generate clean white-background mockups with consistent proportions and lighting, which is useful when you need to expand a catalog without manually rebuilding every scene.
4. Showcase Design Details With Close-Up and Macro Photography
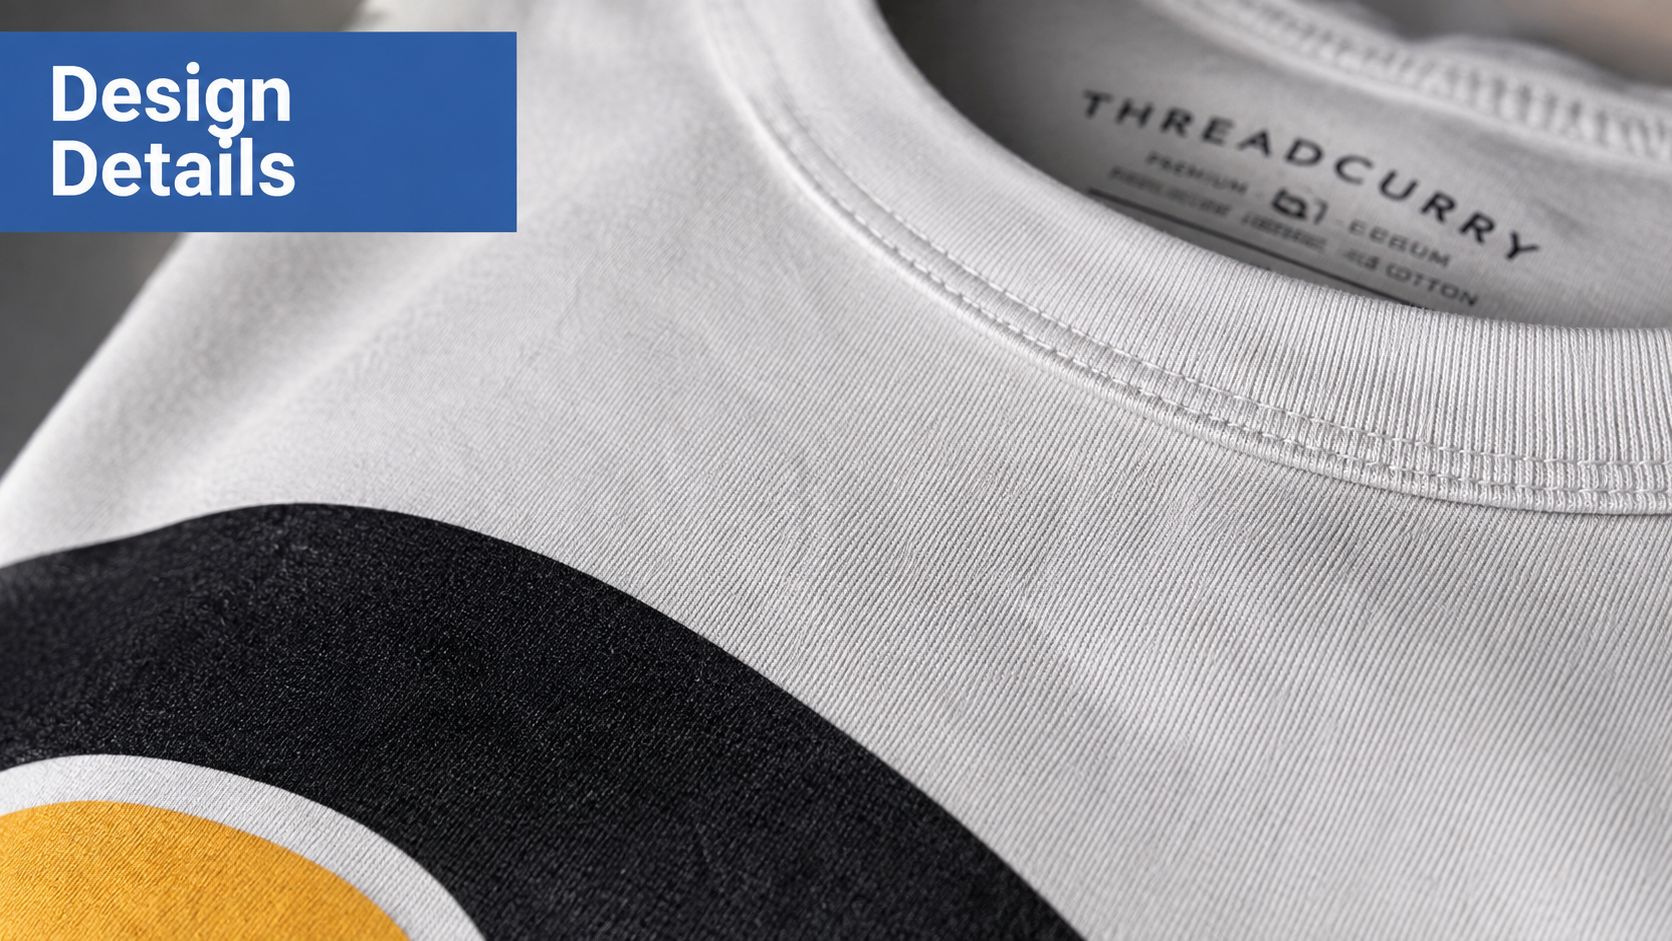
A hero image earns attention, but close-ups help shoppers judge whether the product feels real and worth buying. Apparel buyers want to inspect print edges, ink coverage, embroidery, fabric weave, seams, labels, and other details that disappear in a full-garment shot. Build these images into a repeatable listing sequence so every product communicates both appearance and quality.
Photograph details that answer a specific buying question. A screen-print close-up can reveal ink saturation, edge clarity, and whether fine artwork remains sharp. Embroidery deserves a tight view showing thread density and stitch precision. Textured fabric, metallic finishes, and glow-in-the-dark elements need visual proof because their value depends on how they appear in person.
Don't fill every listing with generic seam photos. A detail image earns its place when it demonstrates a feature, clarifies construction, or reduces uncertainty about comfort, finish, or perceived value.
Show the evidence buyers can't feel. Buyers want to see how the apparel actually fits and moves on a real body, not just an idealized pose. Pair worn images with close-ups that show the physical qualities a screen cannot convey.
Shoot details deliberately
Macro images magnify dust, lint, loose threads, and focus errors. Clean the garment before shooting, stabilize a phone or camera on a tripod, and focus on the printed area rather than the background. A shallow depth of field can look polished, but keep the complete design feature sharp enough for inspection.
Use close-ups selectively. The plan notes recommend 2 to 3 detail shots per product, especially for hero products or garments with special finishes. Place them after the main image and broader angles. Shoppers first understand the product, then examine its construction and finish.
A useful sequence for a premium embroidered sweatshirt includes a front design, a three-quarter worn view, an embroidery close-up, and a fabric or cuff detail. This order combines fit communication with physical evidence and can be reused across a POD catalog. The same sequence also gives mockup automation a clear image structure for consistent listings.
5. Implement Consistent Color Grading Across Your Product Catalog
Color accuracy starts before editing. If one shoot uses cool window light and another uses warm indoor bulbs, the same black, cream, or red garment may appear noticeably different across your store. That inconsistency makes the catalog feel less reliable and can widen the gap between what shoppers expect and what arrives.
Use a white card or gray card during each session to create a reference point. Photograph an actual printed sample under the lighting you'll use, then compare the image with the physical garment. The reference should reflect the product customers will receive, not merely the digital artwork file.
Different materials may need different treatment. Cotton and polyester can reflect light differently, while light and dark garments may require separate exposure adjustments. If you work with multiple print suppliers, validate color with samples from each supplier before applying one preset across the entire catalog.
For more guidance on preparing artwork for production, see Skup's resource on printing digital artwork. Your photography workflow and artwork workflow should agree on the final color story.
Protect trust without chasing perfection
Customer devices display colors differently, so slight variation is normal. The practical target is consistent, believable representation. Don't push saturation to make a design look more dramatic in a thumbnail, because an exaggerated screen color can create disappointment when the package arrives.
Document your settings, lighting temperature, supplier, and garment type. That record helps you reproduce the look when you add another colorway or bring a collaborator into the workflow.
A simple review process catches many problems:
- Compare the sample: Check the photographed garment against the physical product.
- Inspect dark areas: Make sure black fabric doesn't lose the print or texture.
- Review bright colors: Confirm that highlights aren't clipping important design detail.
- Check several devices: View the final image on both a desktop and a phone.
- Keep the treatment consistent: Apply the same approach to images in one product listing.
6. Use Model Variety and Sizing Shots to Increase Conversion and Reduce Returns
Fit is one of the biggest uncertainties in apparel shopping. A size chart provides measurements, but a person wearing the garment shows length, drape, shoulder placement, sleeve position, and overall silhouette much faster.
Show the same design on models with different body types and heights when you can. A petite model may clarify where a shirt falls on a shorter frame, while a taller model can reveal length and proportion. Different ethnicities, ages, and body shapes also help more shoppers recognize themselves in the listing.
The image sequence should support the sizing information rather than replace it. Put a lifestyle or front-on-body image first, then sizing views, then detail shots. Keep lighting, camera distance, and garment positioning as consistent as possible when comparing sizes.
Make fit communication specific
Include model measurements and the size worn in the product description. A statement such as “Model is 5'6" wearing size M” is useful only when it's accurate and paired with a clear image. Add a sizing grid with garment measurements so shoppers can compare the product with something they already own.
For a T-shirt design offered in several sizes, photograph the same print on multiple frames under matching conditions. This helps buyers see how the artwork scales visually and how the garment changes shape. Remember that size usually affects fit and proportions, not the core design concept, so avoid presenting a print as if it has identical placement across every size unless your supplier confirms it.
AvatarIQ can generate diverse model variations without coordinating several shoots. That speed is valuable for testing audience fit, but inspect the output closely. Check hands, seams, neckline structure, print placement, and whether the garment still resembles the product you sell.
Accurate representation is more useful than aspirational perfection. Buyers want to know how the apparel may look on a real body, not just how it looks in an idealized pose.
7. Use Angle and Perspective Shots to Showcase Product Dimensions
A front image confirms the artwork. It cannot fully show how the garment hangs, turns, or fits on a body. Angle and perspective shots supply that missing spatial information, helping shoppers judge shape, construction, print placement, and overall proportions before buying.
Build one repeatable image system for each product type. Start with the clearest front view, then add the views that answer specific fit or construction questions. A T-shirt may need front, back, side or three-quarter, flat-lay, and worn images. A hoodie may require zipped and unzipped front views, a back view, a side view, and an on-body image that shows its silhouette.
Keep the camera distance, lighting, garment position, and angle order consistent across related listings. That consistency makes comparison easier and lets you reuse a proven shooting process instead of treating every design as a separate creative project.
Match the angle to the design
Give a back print its own back image. Show a sleeve graphic from the side or with a close-up angle. Photograph fitted designs from more than one direction so the silhouette is clear. For oversized sweatshirts, choose views that reveal width, length, and shoulder drop.
Flat lays and on-body photos serve different purposes. A flat lay presents the full artwork with minimal obstruction, but it can flatten the fabric and conceal drape. An on-body image communicates wearability, though a pose, body shape, or underlying clothing may cover part of the design. Use both when they resolve different buyer questions.
A practical carousel sequence is:
- Front hero: Make the artwork immediately clear.
- Sizing or on-body view: Show how the garment sits on a person or alongside fit information.
- Back view: Display reverse artwork or blank space.
- Side or three-quarter view: Reveal width, length, and construction.
- Detail angle: Show sleeves, pockets, cuffs, neckline, or print texture.
This order supports sizing communication rather than replacing it. Keep model measurements, size worn, and garment measurements in the listing, then use the images to make those details easier to interpret.
AvatarIQ can produce extra perspective variations for testing poses or settings. Inspect every output for hands, seams, neckline structure, print placement, and product consistency before publishing.
8. Master Post-Processing Optimization for Platform Consistency and Fast Scaling
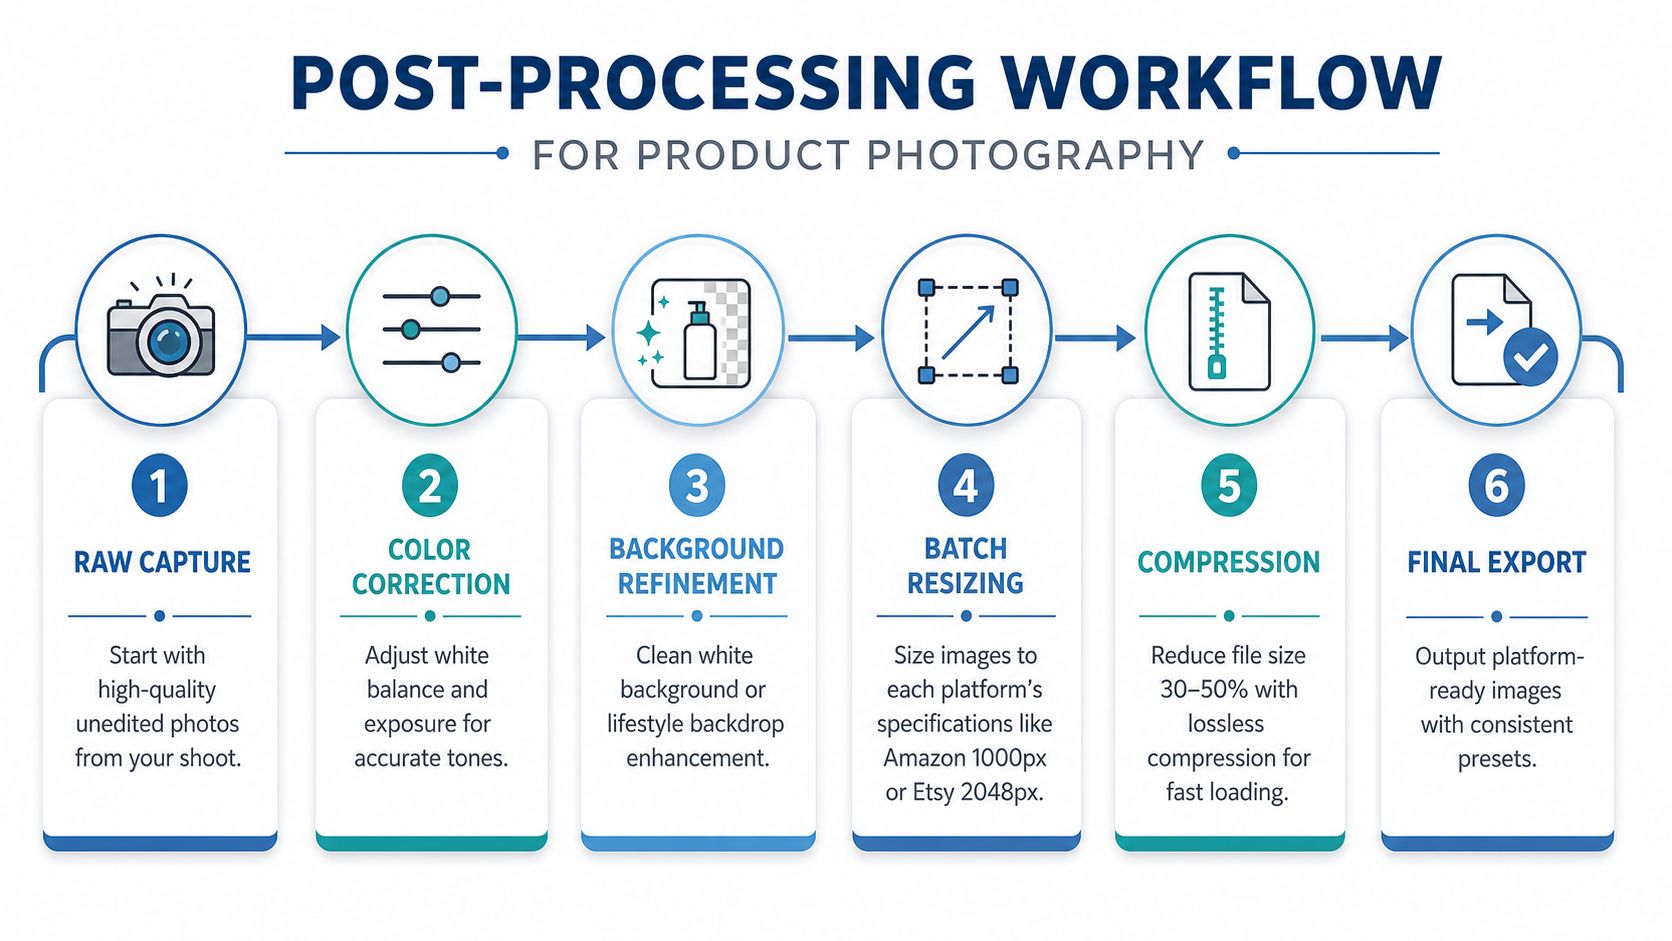
A repeatable editing system lets one product shoot serve marketplace listings, Shopify pages, ads, and mobile shoppers. Process color correction, background cleanup, cropping, resizing, compression, and a final phone review in the same order for every design.
Organize files by product type, design, supplier, and shoot date. Store original files separately from edited versions. Build presets for T-shirts, hoodies, crewnecks, light garments, and dark garments, then adjust only the settings an individual image needs. This keeps mockup production consistent as the catalog grows.
Marketplace requirements differ. Amazon's main image guidance calls for a pure white background, while Shopify needs assets that work across product pages, collection cards, advertising, and mobile layouts. Use Skup's Shopify image sizes guide to plan dimensions and preserve suitable source-file quality.
Optimize for the full visual funnel
Prepare each hero image for several placements. A product page may use a square crop, social content may need a vertical version, and marketplace search may show a tight thumbnail. Leave enough space around the garment during shooting so these crops preserve the product and artwork.
Review every asset on a phone. Confirm that the print remains readable at thumbnail size, the pose leaves the garment visible, and the file loads cleanly. Use descriptive filenames and accurate alt text to keep the catalog organized and accessible.
AvatarIQ can generate platform-ready mockups with consistent lighting, sizing, and backgrounds, which helps when editing becomes the production bottleneck. For higher-resolution source material, review the best AI image upscaler software for 2026.
Keep the image set focused on the five to seven shots that answer distinct buyer questions, then remove any variation that repeats information. This gives each product page a clear sequence while keeping batch editing and mobile review manageable.
8-Point Product Photography Comparison
| Item | Implementation Complexity 🔄 | Resource & Efficiency ⚡ | Expected Outcomes 📊 | Ideal Use Cases 💡 | Key Advantages ⭐ |
|---|---|---|---|---|---|
| Master Lighting for Professional Product Mockups | Moderate, learn light direction, diffusion, three-point setup | Moderate equipment (softboxes/reflectors) and setup time; speeds batch shoots once dialed in | Clear details, accurate colors, higher conversion and consistent catalog performance | Product-focused mockups, studio sessions, design-accuracy critical listings | ⭐⭐⭐⭐, professional look, consistent results, improved conversions |
| Use Lifestyle Shots to Tell Your Brand Story | High, coordinate models, locations, natural interactions | Higher cost/time (models, locations); slower per image but high engagement value | Strong emotional connection, higher engagement and conversion on social channels | Brand storytelling, ads, social content, niche/audience-facing campaigns | ⭐⭐⭐⭐, emotional resonance, shareability, shows fit in context |
| Perfect Your White Background Setup for Clean, Focused Listings | Low, straightforward setup but requires proper lighting | Low equipment cost (white backdrop, lights); very efficient and highly scalable | Fast production, uniform catalog, platform-ready images, reduced editing overhead | Marketplace listings (Amazon/Shopify/Etsy), bulk product uploads | ⭐⭐⭐⭐, fastest to scale, platform compatibility, low cost |
| Showcase Design Details with Close-Up and Macro Photography | Moderate–High, precise focus, controlled lighting, tripod use | Specialized gear (macro lens), longer shoot and editing time; slower per shot | Demonstrates quality and craftsmanship, justifies premium pricing, reduces returns | Premium products, intricate prints, embroidery or special finishes | ⭐⭐⭐⭐, proves quality, differentiates from low-cost competitors |
| Implement Consistent Color Grading Across Your Product Catalog | Moderate, requires color knowledge and preset creation | Editing software + color references; efficient after initial setup (batch presets) | Cohesive brand aesthetic, accurate color reproduction, fewer color-related returns | Brands prioritizing color accuracy, multi-vendor printing, large catalogs | ⭐⭐⭐⭐, brand cohesion, reduced returns, faster post-processing |
| Use Model Variety and Sizing Shots to Increase Conversion and Reduce Returns | High, schedule multiple models/sizes and maintain consistency | Significant coordination and asset storage; higher upfront cost but high impact | Higher conversion, fewer returns, broader market reach, stronger trust signals | Inclusive sizing, diverse target audiences, fit-focused products | ⭐⭐⭐⭐⭐, largest conversion lift, reduces returns, signals inclusivity |
| Leverage Angle and Perspective Shots to Showcase Product Dimensions | Low–Moderate, more shots per product and consistent positioning | Modest resources (time, storage); scalable with a consistent workflow | Better spatial understanding, fewer surprises, improved buyer confidence | All apparel listings; products benefiting from silhouette/placement views | ⭐⭐⭐⭐, fuller product viewpoint, reduces surprises and returns |
| Master Post-Processing Optimization for Platform Consistency and Fast Scaling | Moderate, learn batch workflows, presets, and export specs | Software, presets, automation tools; high efficiency once automated | Platform-ready assets, faster publishing, consistent presentation, improved load times | High-volume catalogs, multi-platform sellers, scaling operations | ⭐⭐⭐⭐, enables scale, consistency, faster time-to-listing |
Turn Your Next Design Into a Complete Image Set
Start with one design, not your entire catalog. Build a complete image set for a promising product, review how the listing looks on mobile, and use the results to improve the process before repeating it across more apparel.
Your first shot should be a clean hero image that makes the design easy to understand immediately. Add a back or three-quarter view, depending on where the artwork appears. Include a fit or lifestyle image that shows the garment on a person, then capture one useful detail that proves print quality, texture, embroidery, or another meaningful feature.
A beginner-friendly shot list might look like this:
- Hero image: Clean front view with the design clearly visible.
- Reverse or angle view: Show the back, side, or three-quarter shape.
- Fit image: Put the garment on a model and state the size worn.
- Lifestyle image: Place the apparel in a setting that matches the audience.
- Detail image: Show print texture, stitching, fabric, cuffs, pocket, or label.
- Mobile crop: Confirm that the design remains readable in a small frame.
Save that list as a repeatable standard. Use the same order for similar products, then change only the images that need to reflect a specific design or garment feature. This approach turns product photography into part of your listing system, rather than a creative task you have to reinvent every time.
You can shoot physically with a phone, window light, foam board, and a tripod. You can also use AvatarIQ when model coordination, location access, or editing time becomes the constraint. The right choice depends on the product, the channel, and how quickly you need to publish. A physical shoot may communicate actual fabric behavior more directly, while AI mockups can help you test more scenes and model variations at speed.
Review the final sequence as a buyer would. Can someone identify the design at a glance? Can they understand the fit? Can they inspect the print? Does the color look believable? Does the listing still work when viewed on a small screen?
Product photography has become a major commercial category as online retail has moved product inspection from physical stores to screens. Industry summaries estimate the global ecommerce product photography market at about $2.3 billion in 2026, while related reporting estimates product photography at roughly 45% of the commercial photography market. One segment estimate places that market at US$163.91 million in 2025, with a projection of US$275.4 million by 2030 at an 11.6% CAGR. ElectroIQ's product photography market summary presents those estimates.
The opportunity for POD sellers is practical. Every design already has a chance to become a product, and a stronger image system gives shoppers more reasons to understand, trust, and remember it. Build the workflow once, improve it with each listing, and let better presentation give every new apparel idea a stronger opportunity to earn attention and sales.
Skup helps POD apparel sellers connect product creation, mockups, and ecommerce execution in one practical workflow. Use Skup to explore AvatarIQ for faster apparel mockups and photoshoot-style images, and review the Apparel Cloning System if you want a structured path for turning promising designs into complete listings.